Create a VMware ESXi 5 PXE unattended scripted installation using Windows
The most information available on how-to perform a unattended scripted installation of VMware ESXi 5 is based on Linux. Here is a procedure how-to create a scripted installation of VMware ESXi 5 using Microsoft Windows.
Here is an overview of the boot process:

What do we need
The following software must be downloaded:
- Syslinux 3.86 (This is the Syslinux version VMware supports)
- FileZilla Server 0_9_39
- TFTPD 4.00
- Notepad ++
- VMware ESXi 5 ISO
Step 1 Windows XP
This procedure is tested with Microsoft Windows XP SP2. The following requirements must be met:
- In Windows XP use a fixed IP. In this example we use 192.168.1.1/24 IP address
- Make sure there is enough free disk space available (approximately 500 MB needed)
- Disable the Windows firewall
Step 2 Create directory structure
Create the following directory structure in the root of the C: partition:
C:\PXEboot
C:\PXEboot\\pxelinux.cfg
C:\PXEboot\\kickstart
Step 3 Copy the content of the ESXi 5 ISO
Mount the VMware ESXi 5 ISO and copy the content to following folder:
c:\PXEboot_ directory
Step 4 Copy the Syslinux files
The Syslinux files allow the target ESXi server to boot the ESXi installer.
- Extract Syslinux 3.86 and:
- Copy the pxelinux.0 and menu.c32 files to the C:\PXEboot directory.
- Overwrite the menu.c32 file
Step 5 Install & Configure tftpd32
The Tftpd32 utility gets the function DHCP and TFTP server.
- Run Tftpd32.exe and make the following configuration settings:
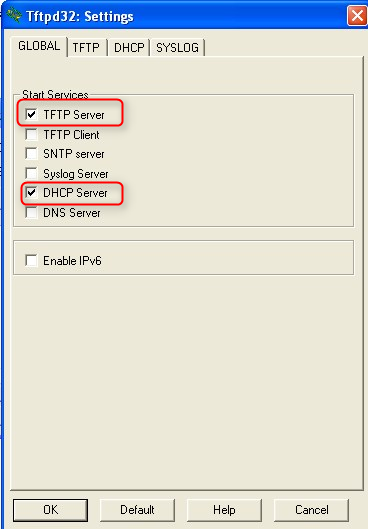 |  |
| Choose: TFTP Server & DHCP Server | Point the base directory to c:\PXEboot |
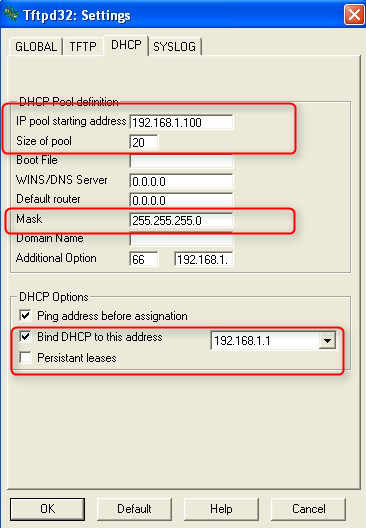 | 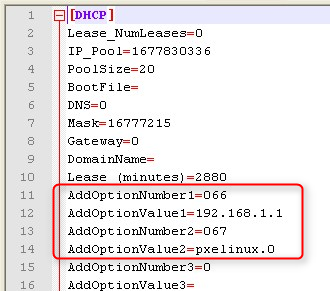 |
| Create a DHCP range | Edit the ini file c:\program files\tftpd32\tftpd32.ini. Add the DHCP options 066 with DHCP server IP address and 067 pxelinux.0 |
- Restart and run the tftpd32.exe utility
Step 6 Install & configure FileZilla server
- Install the FileZilla Server with the default settings
- Create a user username: VMware password: VMware

- Add a shared folder c:\PXEboot\Kickstart folder with the default rights

Step 7 Create default file
Create a file named default (Use notepad ++ for the file creation) and save the file in the C:\PXEboot\pxelinux.cfg directory. Here is an example default script:
DEFAULT menu.c32
MENU TITLE ESXi 5 Boot menu
NOHALT 1
PROMPT 0
TIMEOUT 80

LABEL install
 KERNEL mboot.c32
 APPEND -c boot.cfg
 MENU LABEL ^ESXi-5 Interactively install

Label ESXi 5 install scripted
 KERNEL mboot.c32
 APPEND -c boot.cfg ks=ftp://VMware:VMware@192.168.1.1/ks.cfg +++
 MENU LABEL ^ESXi5-01 Scripted install
 IPAPPEND 1

LABEL hddboot
 LOCALBOOT 0x80
 MENU LABEL ^Boot from local disk
If you want to install more VMware ESXi 5 servers you can add extra entries in the default file and point them to separate Kickstart file.
Step 8 Create ks.cfg file
Create a Kickstart file named ks.cfg (Use notepad ++ for the file creation ) and place the file in the c:\PXEboot\Kickstart directory. Here is a sample ks.cfg script:
#Sample kickstart scripted installation
vmaccepteula
rootpw VMw@re
install --firstdisk --overwritevmfs
network --bootproto=static --ip=192.168.250.21 --gateway=192.168.250.1 --nameserver=192.168.250.6 --netmask=255.255.255.0 --hostname=esxi5-01.beerens.local --device=vmnic0 --addvmportgroup=0
reboot

%firstboot --interpreter=busybox
# Rename local datastore name
vim-cmd hostsvc/datastore/rename datastore1 "$(hostname -s)-local-storage-1"
# DNS names
esxcli system hostname set --fqdn=esxi5-01.beerens.local
esxcli network ip dns search add --domain=beerens.local
# DNS server addresses
esxcli network ip dns server add --server=192.168.250.6
esxcli network ip dns server add --server=192.168.250.1
# SSH and ESXi shell
vim-cmd hostsvc/enable\_ssh
vim-cmd hostsvc/start\_ssh
vim-cmd hostsvc/enable\_esx\_shell
vim-cmd hostsvc/start\_esx\_shell
Step 9 Test the installation
Boot the server and select ESXi5-01 Scripted Install option to test the scripted installation.
