PowerCLI help install, update and troubleshooting tips
PowerCLI is a must-have tool for every VMware Administrator when you want to automate something in your VMware environment. In this blog, I highlight the installation, updating, and some troubleshooting tips for deploying and running PowerCLI on Windows OSes.
PowerCLI installation
- Uninstall PowerCLI 6.x and earlier from the Add/remove programs or Programs and Features if exist.
- Make sure you have an internet connection.
- Check if Windows Management Framework 5.1 is installed for Windows 7,8 and Windows Server 2012 R2 and earlier OSes. Open PowerShell en enter:
$PSVersionTable
PS C:\$PSVersionTable

Name Value
---- -----
PSVersion 5.1.17763.592
PSEdition Desktop
PSCompatibleVersions {1.0, 2.0, 3.0, 4.0...}
BuildVersion 10.0.17763.592
CLRVersion 4.0.30319.42000
WSManStackVersion 3.0
PSRemotingProtocolVersion 2.3
SerializationVersion 1.1.0.1
- If WMF 5.1 is not installed. Install the WMF 5.1 can be downloaded here, link . Windows 10, Windows Server 2016, and above have PowerShell version 5.1 already installed.
- Installation PowerCLI
Install-Module -Name VMware.PowerCLI
PowerCLI installation with admin rights:
Install-Module VMware.PowerCLI -AllowClobber -SkipPublisherCheck
Use the -AllowClobber when you get: A command with the name Export-VM is already available on this system.
Install-Module VMware.PowerCLI -AllowClobber
Update PowerCLI
Update-Module -Name VMware.PowerCLI
These modules are installed in the following location:
%homepath%\Documents\WindowsPowerShell\Modules
- Allow the execution of local scripts Admin rights needed:
Set-ExecutionPolicy RemoteSigned
- Disable certificate checking and CEIP
Set-PowerCLIConfiguration -InvalidCertificateAction Ignore -Confirm:$false -ParticipateInCeip $false
- PowerCLI upgrade fails with a certificate error. The following error can occur when try to upgrade VMware.PowerCLI.
Install-Module VMware.PowerCLI -Force -SkipPublisherCheck
Install the VMware Horizon Module
- Download the Horizon modules from GitHub: Link
- Extract it
- Copy the VMware.Hv.Helper folder to the modules path
Updating PowerCLI
The following steps can be used to update a PowerCLI 10 or 11 installation
- Make sure you have a internet connection.
- Check the PowerCLI version
Get-Module VMware\* -ListAvailable
- Update the existing PowerCLI version
Update-Module -Name VMware.PowerCLI
- Check the version of PowerCLI
Get-Module -Name VMware.PowerCLI -ListAvailable
Troubleshooting PowerCLI
The following troubleshooting options can be used when having problems with the installation and running of PowerCLI such as:
Could not load file or assembly……………….
- Disable the Anti Virus.
- Uninstall PowerCLI 6.x and earlier from the Add/remove programs or Programs and Features if exist.
- Uninstall PowerCLI.
Get-Module VMware.PowerCLI -ListAvailable | Uninstall-Module -Force
- Check the paths for VMware modules entries in the path. Remove VMware folder if exist.
$env:PSModulePath.Split(';')
- List All the VMware modules and remove VMware modules.
Get-Module -Name VMware\* -ListAvailable
- Check for old PowerCLI modules and installations such as:
C:\Program Files (x86)\VMware\Infrastructure\PowerCLI\Modules
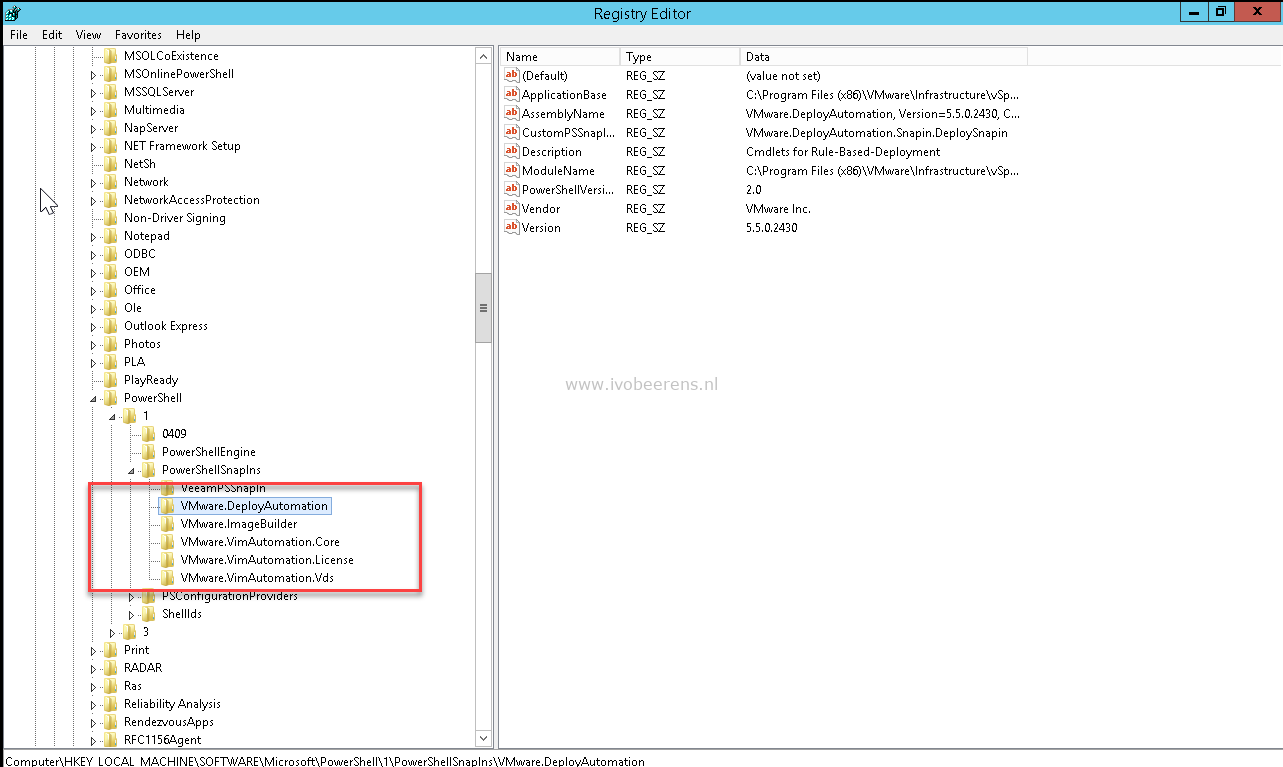
- List registered snapins.
Get-PSSnapin -registered
- Delete the registry keys of the old PS snapins.
[
- Reboot the Windows system.
Try to install the PowerCLI module using a clean install as described above.
The PowerCLI page can be found here: VMware Developer Documentation