Use Packer to install Windows 11 and enable vTPM and VBS
I use Packer for building images for VMware VDI environments. With the latest version (when writing this blog Packer version 1.7.7 is the latest version) it is not possible to configure a TPM in the Hashicorp Configuration Languag (HCL) config file. TPM 2.0 is required to install Windows 11. A vTPM emulates a physical TPM 2.0 and is available in VMware vSphere.
Update: January 27, 2022: Packer with the VMware vSphere plugin ((V1.0.3) has now support for adding a vTPM device. More information can be found here: link .
You can install Windows 11 using a registry hack (link ) to bypass the TPM check:
reg ADD "HKLM\SYSTEM\Setup\LabConfig" /f /v BypassSecureBootCheck /t REG_DWORD /d 1
vCommunity member Sidney Laan from vEUCaddict wrote a nice blog about using Packer to install Windows 11 using this registry hack (link ). When using this hack, it doesn’t enable vTPM or VBS.

For LAB environments, this is no issue but for production, environments you want to have a vTPM enabled and even Virtualization-Based Security (VBS) depending on the security requirements.
So what are TPM and VBS?
TPM
Trusted Platform Module (TPM) technology is designed to provide hardware-based, security-related functions. A TPM chip is a secure crypto-processor that helps you with actions such as generating, storing, and limiting the use of cryptographic keys.
VBS
Virtualization-based security, or VBS, uses hardware virtualization features to create and isolate a secure region of memory from the normal operating system. Windows can use this “virtual secure mode” to host a number of security solutions, providing them with greatly increased protection from vulnerabilities in the operating system, and preventing the use of malicious exploits which attempt to defeat protections.
After the Windows 11 installation with Packer, it is possible to add a vTPM and even enable Virtualization-Based Security (VBS) by using VMware PowerCLI.
Requirements
- Use vCenter Server system versions 6.7 or later
- Add a Key Provider (link )
- Install PowerCLI by using the following command in PowerShell:
powershellInstall-Module VMware.PowerCLI -Scope CurrentUser - The Windows 11 VM must be powered off
- Use VM hardware version 14 or higher
- Don’t create a snapshot with Packer (create_snapshot = false)
PowerCLI Script
The following PowerCLI script can be executed after the Packer Windows 11 deployment. This script adds vTPM, enables VBS support, and creates a snapshot.
- Change the variables for your environment.
# Import PowerCLI
Import-Module VMware.PowerCLI

# Variables
$vcentername = "vcentername"
$VMTempName = "VMname"
$snapname = "v0.1"
$snapdescription = "Packer deployement with vTPM and VBS enabled"

# Connect to vCenter Server
Connect-VIServer -Server $vcentername

# Add vTPM
Write-Host 'Set vTPM'
New-VTpm -VM $VMTempName

# Enable Virtualization Based Security (VBS)
Write-Host 'Enable VBS'
$vm = Get-VM $VMTempName
$spec = New-Object VMware.Vim.VirtualMachineConfigSpec
$spec.Firmware = [VMware.Vim.GuestOsDescriptorFirmwareType]::efi
$spec.NestedHVEnabled = $true
$boot = New-Object VMware.Vim.VirtualMachineBootOptions
$boot.EfiSecureBootEnabled = $true
$spec.BootOptions = $boot
$flags = New-Object VMware.Vim.VirtualMachineFlagInfo
$flags.VbsEnabled = $true
$flags.VvtdEnabled = $true
$spec.flags = $flags
$vm.ExtensionData.ReconfigVM($spec)

# Create Snapshot
Write-Host 'Create snapshot' -ForegroundColor green
Get-VM -Name $VMTempName | New-Snapshot -Name $snapname -Description $snapdescription

# Disconnect vCenter Server
Disconnect-VIServer -Server * -Confirm:$false
- When the script is finished, vTPM and VBS support is added
- Start the VM
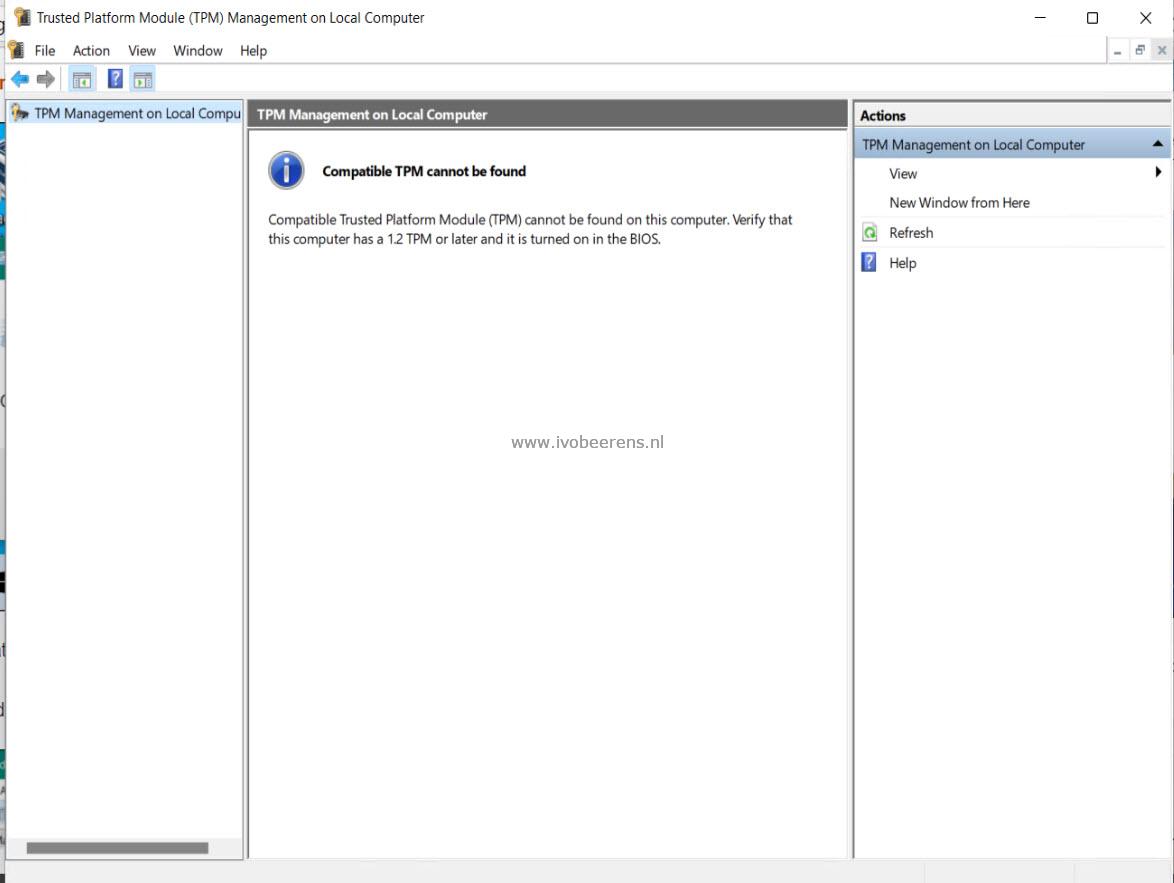
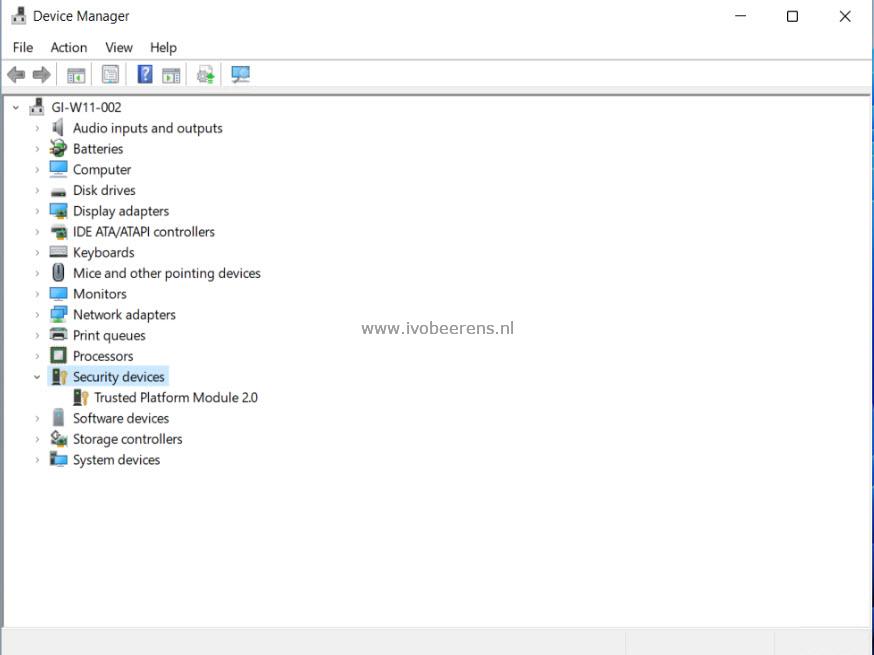
- Check if a TPM is displayed in Device Manager and with the TPM.MSC command

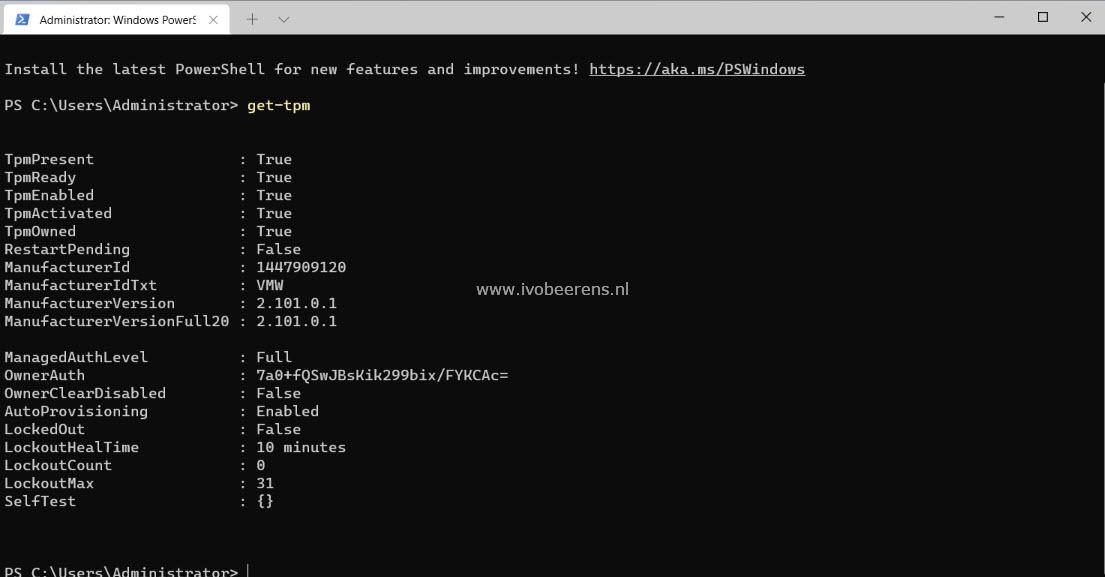
- Using PowerShell the command
Get-TPMcan check the presence of the TPM
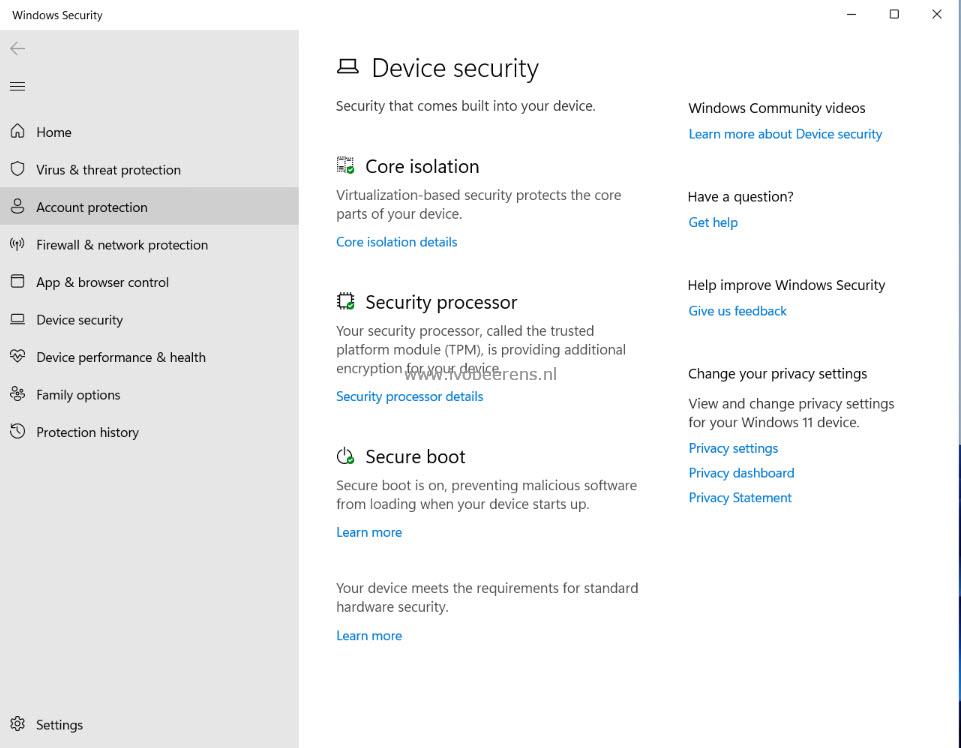
- For Enabling VBS (*1) go to “Device security” in Windows 11, select “Core isolation details” and enable “Memory Integrity”
- Enabling VBS can also be done by using the following registry settings
reg add "HKLM\SYSTEM\CurrentControlSet\Control\DeviceGuard" /v "EnableVirtualizationBasedSecurity" /t REG_DWORD /d 1 /f
reg add "HKLM\SYSTEM\CurrentControlSet\Control\DeviceGuard" /v "RequirePlatformSecurityFeatures" /t REG_DWORD /d 1 /f
reg add "HKLM\SYSTEM\CurrentControlSet\Control\DeviceGuard" /v "Locked" /t REG_DWORD /d 0 /f
reg add "HKLM\SYSTEM\CurrentControlSet\Control\DeviceGuard\Scenarios\HypervisorEnforcedCodeIntegrity" /v "Enabled" /t REG_DWORD /d 1 /f
reg add "HKLM\SYSTEM\CurrentControlSet\Control\DeviceGuard\Scenarios\HypervisorEnforcedCodeIntegrity" /v "Locked"
More info: Link
(*1) Adding VBS in Windows 11 can have a performance impact on the VM
- Reboot the VM

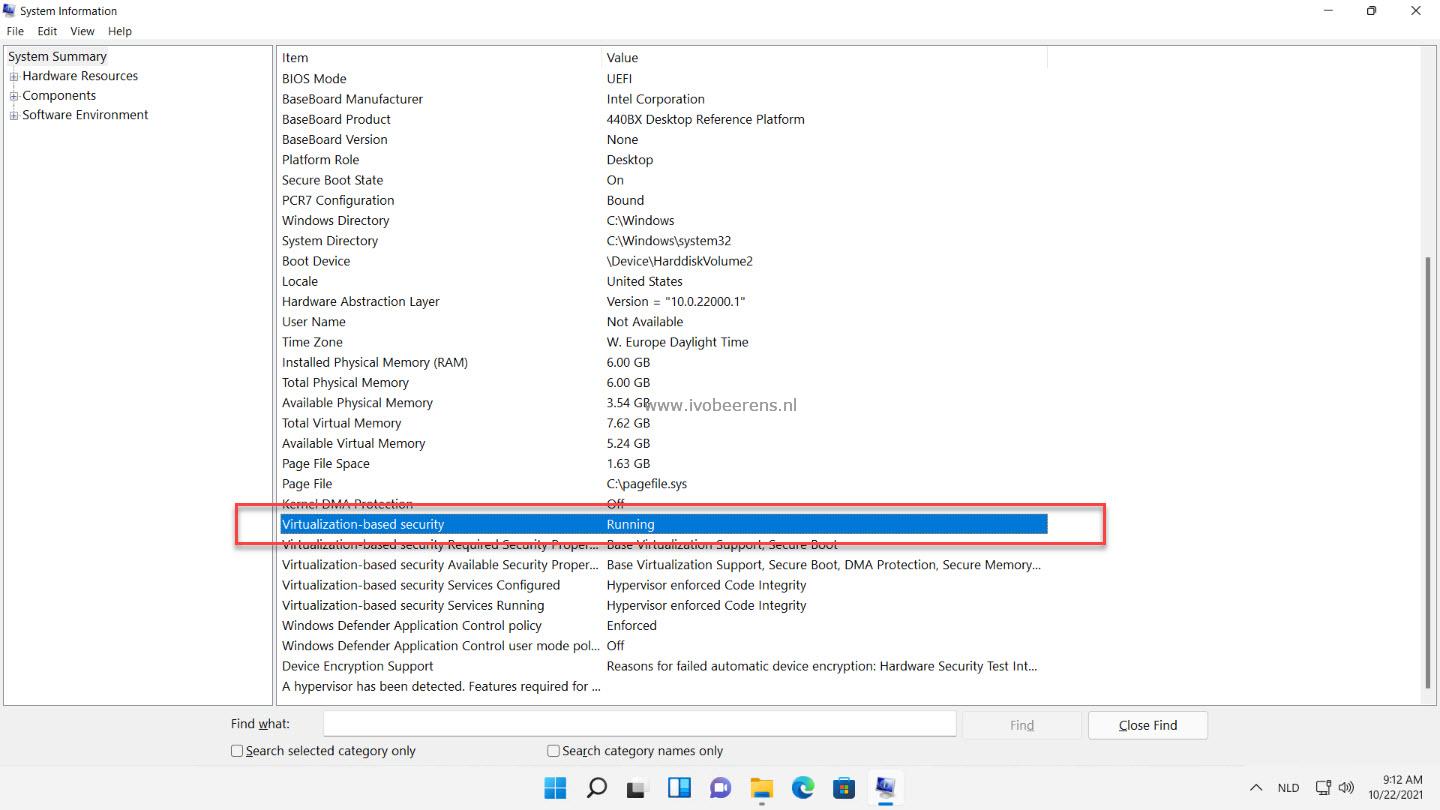
- When the VM is restarted run “msinfo32”
- Scroll down and check if “Virtualization-Based Security” is running
Adding the PowerCLI script after the Packer deployment will enable vTPM and VBS for the Windows 11 VM. I hope the vTPM and VBS options will be added soon in Packer so we use the HCL config file without the need for an extra PowerCLI script.