Create Windows VMs in Azure with Terraform
With Terraform you can easily create new VMs in an existing Azure environment in a couple of minutes. For example, when I want to test an application, I create a new VM and install the application. When I finish testing I remove the VM with a single command. The VM creation only takes a couple of minutes.
In this example, an Azure VM is created using existing Azure resources (Resource Group, VNet, and Subnet) with the following settings:
- A Windows Server 2022 or Windows 11 22H2 Enterprise multi-session VM with the options trusted launch, secure boot, and vTPM enabled
- The VM has a public and private IP address or only a private IP address
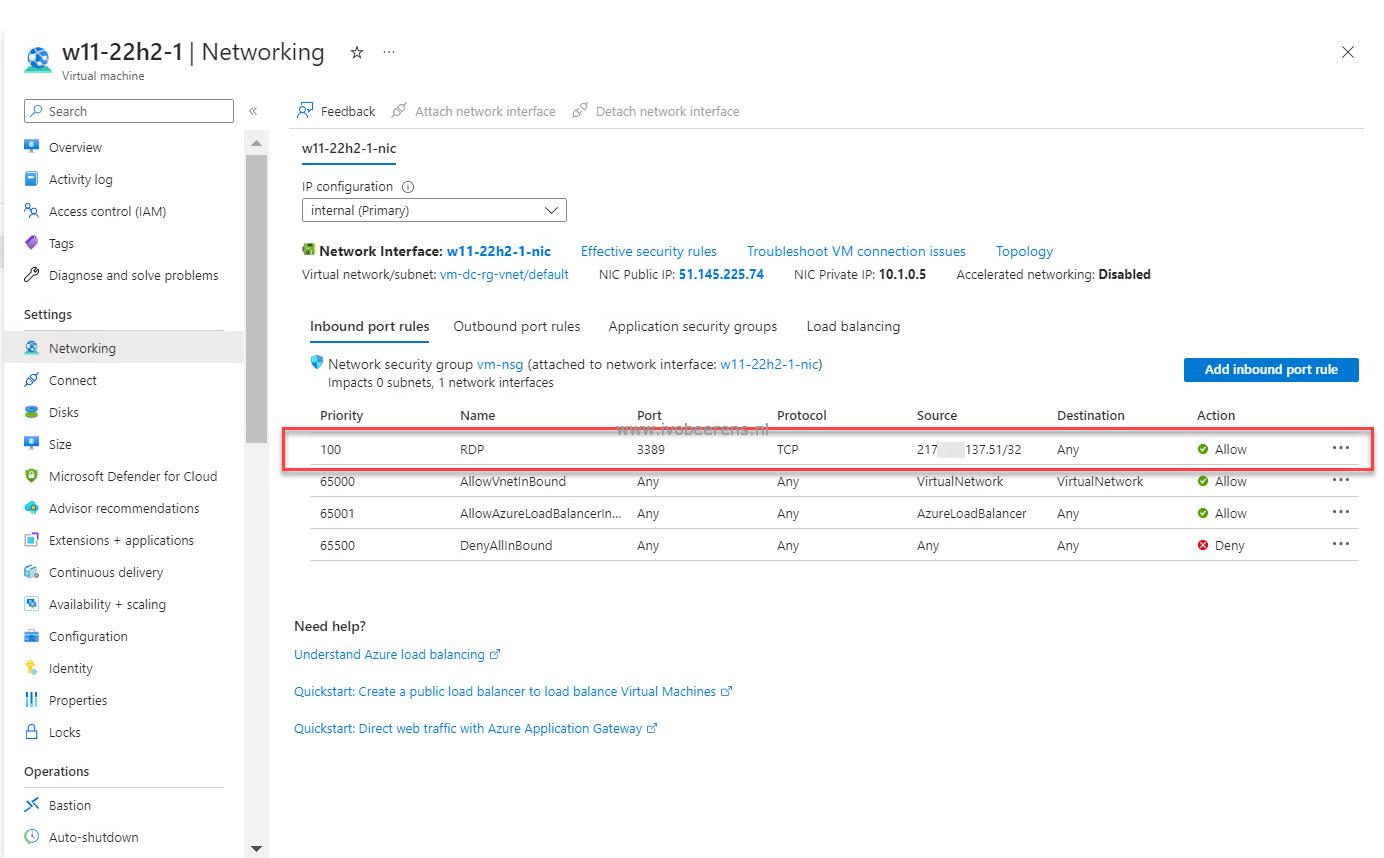
- When defining a public IP address, a Network Security Group (NSG) is created with an RDP rule that only allows the external IP address
- A Custom Script Extension that downloads and executes a PowerShell script
- Automatically Shutdown the VM at a given time
After the test completes, the VM is destroyed by Terraform. When creating images (golden images) I use other tools such as Hashicorp Packer for example.
File structure
In the Terraform file structure, the following files are created:
- terraform.tfvars - The values of the variables are defined in this file. This is the only file that’s needed to be modified.
- variables.tf - Contains all the defined variables.
- provider.tf - Contains the Azure Cloud provider Terraform communicates with.
- main.tf - This is the main configuration file for creating the VM
In an existing environment, we already have resources that are not managed by Terraform as part of the deployment. In the terraform.tfvars file we can define the names of the existing resources the VM is going to use such as:
- Resource Group
- Region
- The VNET
- The Subnet
terraform.tfvars
In the terraform.tfvars, all the values of the variables are defined. I use comments (single line) and comment blocks with the following syntax:
Single line begin with: //
Multiple lines: begins with: /* and ends with */
The comment blocks are used for excluding multiple lines from the Terraform files:
- vm_name - The name of the VM
- vm_rg - An existing Resource Group where the VM resources will be created
- vnet_rg - An existing VNet resource group
- vnet_name - An existing VNet name
- vm_size - VM type
- vm_username - Local Administrator username
- tag_environment - Environment tag
Operating System
Windows Server 2022 and Windows 11 22H2 Enterprise multi-session with trusted launch, secure boot, and vTPM enabled are defined. Select one OS.
Windows 11 22H2 Enterprise Multi-Session
offer = "Windows-11"
publisher = "microsoftwindowsdesktop"
sku = "win11-22h2-avd"
Windows Server 2022
offer = "windowsserver"
publisher = "microsoftwindowsserver"
sku = "2022-datacenter-azure-edition"
- vm_storage - Type of storage used
- vm_timezone - Which Timezone is used
- file_uris - File location of the Custom Script Extension
- vm_shutdown - VM shutdown time
Change the values to your needs.
Private/Public IP address
When deploying VMs it is not recommended to give them a public IP address because everyone can connect to the VM from outside the network. But without a VPN connection, you need a public IP for connecting the VM by RDP for example. When deploying a VM with a public IP address make sure to create a Network Security Group (NSG) with an RDP rule that only allows the public IP access to the VM. The cool thing is that the public IP is not hardcoded in the script. A service called https://api.ipify.org will get the public IP address.
Public IP address
If you have a VPN connection a private IP is sufficient. The following lines can be excluded:
// Not needed when using a VPN or Bastion
public_ip_address_id = azurerm_public_ip.public_ip.id
and the RDP rule:
// Not needed when using a VPN or Bastion
// NSG Security RDP rule(s)
resource "azurerm_network_security_rule" "vm-sec-rule" {
  access                      = "Allow"
  destination_address_prefix  = "*"
  destination_port_range      = "3389"
  direction                   = "Inbound"
  name                        = "RDP"
  network_security_group_name = azurerm_network_security_group.vm-nsg.name
  priority                    = 100
  protocol                    = "Tcp"
  resource_group_name         = data.azurerm_resource_group.vm-rg.name
  source_address_prefixes     = local.authorized_ip_ranges
  source_port_range           = "*"
  depends_on = [
    azurerm_network_security_group.vm-nsg,
  ]
}
Custom Script Extension
The azurerm_virtual_machine_extension resource, downloads and run a script in the VM as a post-deployment task. As a location, I use my own GitHub repository. In the repository is a PowerShell script that performs the following post-deployment tasks:
- Allow ICMP ping requests to the VM
- Set the Power Management profile to “High Performance”
- Create a c:\temp folder
- Set the OS label to OperatingSystem
- Install the Chocolatey package manager
- Install Visual Studio Code
- Install NotePad++
Automatically shutdown
With the azurerm_dev_test_global_vm_shutdown_schedule resource, you can control the shutdown time of the VM. This can be useful if you want to stop (deallocated) the VM to save costs. In the terraform.tfvars file, you set the vm_shutdown value.
Create the VM
To run Terraform, execute step 1 till 3 found here: link
First, initialize terraform which downloads the Terraform provider(s) defined:
terraform init
The password is not hardcoded in the terraform.tfvars file. With the Terraform apply command you can set the password for the variable “vm_password”. The apply option creates a plan and executes this. The –auto-approve option doesn’t ask for confirmation to apply changes:
terraform apply -var "vm\_password=ThisisaGoodPassword!" --auto-approve
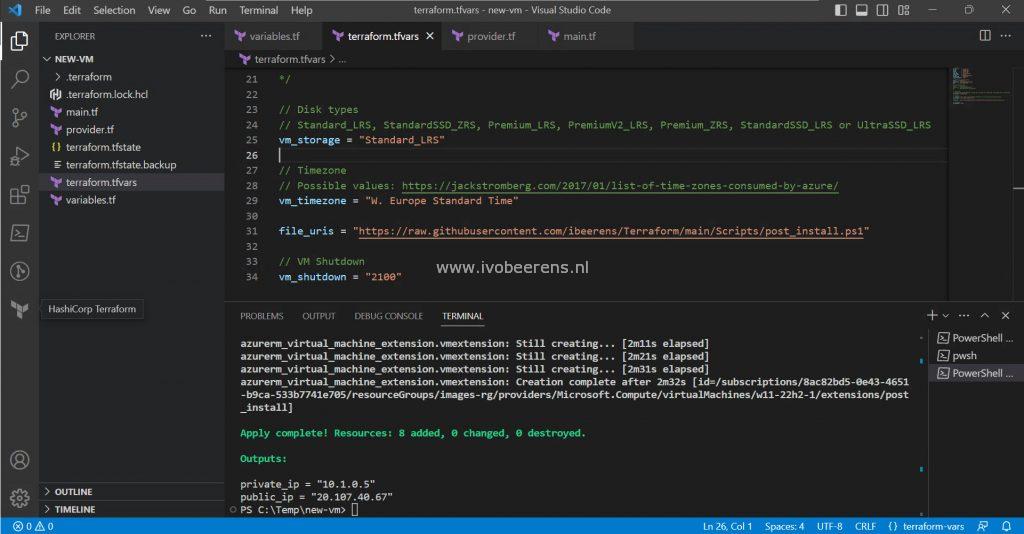
After a couple of minutes, the VM is created and the private and public IP addresses are displayed as output values.
Destroying the Windows VM
When finishing with testing the VM can be destroyed without destroying the existing resources such as:
- Resource Group
- The VNet
- The Subnet
The following command destroys the VM just created:
terraform destroy -var "vm\_password=ThisisaGoodPassword!" --auto-approve
Conclusion
This example shows one of the strengths of Terraform. You only need to change a single file (terraform.tfvars) once that includes the values of the variables. With a single command, you create a VM in a couple of minutes, and with a single command, you destroy the VM with all the resources you created. Very powerful!
The GitHub repository can be found here: Link